QT+VS 在项目中新建子窗体ui,生成h文件、cpp文件、moc文件 |
您所在的位置:网站首页 › qt ui生成uih的过程 › QT+VS 在项目中新建子窗体ui,生成h文件、cpp文件、moc文件 |
QT+VS 在项目中新建子窗体ui,生成h文件、cpp文件、moc文件
|
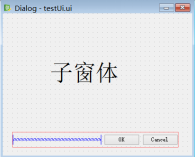
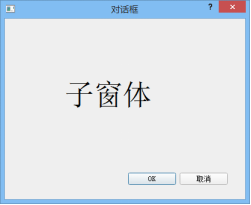
(1)绘制子窗体 在项目中新建子窗体ui文件,命名为testUi.ui。 (2)新建上述窗体文件对应的ui类 建议将ui类与子窗体设置成相同的名字(testUi.h、testUi.cpp),此时testUi还是一个只包含默认构造函数和析构函数的空类。 (3)生成moc_testUi.cpp文件 moc文件作用:Qt程序在交给标准编译器预编译之前要使用 moc 分析 C++ 源文件。 1)去项目文件夹下找到该项目的工程文件(文件类型为:VC++ Project,一般与解决方案文件*.sln放在一起),打开(建议使用Notepad++或者VSCode打开)。 VsursPoleWidget.ui文件 Document $(OSGEO4W_ROOT)\apps\Qt5\bin\uic.exe;%(AdditionalInputs) Uic%27ing %(Identity)... .\GeneratedFiles\ui_%(Filename).h;%(Outputs) "$(OSGEO4W_ROOT)\apps\Qt5\bin\uic.exe" -o ".\GeneratedFiles\ui_%(Filename).h" "%(FullPath)" $(OSGEO4W_ROOT)\apps\Qt5\bin\uic.exe;%(AdditionalInputs) Uic%27ing %(Identity)... .\GeneratedFiles\ui_%(Filename).h;%(Outputs) "$(OSGEO4W_ROOT)\apps\Qt5\bin\uic.exe" -o ".\GeneratedFiles\ui_%(Filename).h" "%(FullPath)" DesignerVsursPoleWidget.h文件 $(OSGEO4W_ROOT)\apps\Qt5\bin\moc.exe;%(FullPath) Moc%27ing %(Filename).h... .\GeneratedFiles\$(ConfigurationName)\moc_%(Filename).cpp "$(OSGEO4W_ROOT)\apps\Qt5\bin\moc.exe" "%(FullPath)" -o ".\GeneratedFiles\$(ConfigurationName)\moc_%(Filename).cpp" -DUNICODE -DWIN32 -DQT_LARGEFILE_SUPPORT -DQT_DLL -DQT_CORE_LIB -DQT_GUI_LIB "-I." "-I$(OSGEO4W_ROOT)\apps\Qt5\include" "-I$(OSGEO4W_ROOT)\apps\Qt5\include\QtCore" "-I$(OSGEO4W_ROOT)\apps\Qt5\include\QtGui" $(OSGEO4W_ROOT)\apps\Qt5\bin\moc.exe;%(FullPath) Moc%27ing %(Filename).h... .\GeneratedFiles\$(ConfigurationName)\moc_%(Filename).cpp "$(OSGEO4W_ROOT)\apps\Qt5\bin\moc.exe" "%(FullPath)" -o ".\GeneratedFiles\$(ConfigurationName)\moc_%(Filename).cpp" -DUNICODE -DWIN32 -DQT_LARGEFILE_SUPPORT -DQT_DLL -DQT_NO_DEBUG -DNDEBUG -DQT_CORE_LIB -DQT_GUI_LIB "-I." "-I$(OSGEO4W_ROOT)\apps\Qt5\include" "-I$(OSGEO4W_ROOT)\apps\Qt5\include\QtCore" "-I$(OSGEO4W_ROOT)\apps\Qt5\include\QtGui"VsursPoleWidget.cpp文件 moc_VsursPoleWidget.cpp文件 true分别把上述4个代码块复制粘贴,然后把粘贴后代码块中的"VsursPoleWidget"替换成"testUi"。但此处需要注意文件路径的问题,VsursPoleWidget.ui文件位于项目文件加的ui子文件夹下,VsursPoleWidget.h文件位于business子文件夹下,VsursPoleWidget.cpp文件也位于business子文件夹下。若testUi位于其他子文件夹下,则需要修改对应的子文件夹名称,结果如下: testUi.ui文件 Document $(OSGEO4W_ROOT)\apps\Qt5\bin\uic.exe;%(AdditionalInputs) Uic%27ing %(Identity)... .\GeneratedFiles\ui_%(Filename).h;%(Outputs) "$(OSGEO4W_ROOT)\apps\Qt5\bin\uic.exe" -o ".\GeneratedFiles\ui_%(Filename).h" "%(FullPath)" $(OSGEO4W_ROOT)\apps\Qt5\bin\uic.exe;%(AdditionalInputs) Uic%27ing %(Identity)... .\GeneratedFiles\ui_%(Filename).h;%(Outputs) "$(OSGEO4W_ROOT)\apps\Qt5\bin\uic.exe" -o ".\GeneratedFiles\ui_%(Filename).h" "%(FullPath)" DesignertestUi.h文件 $(OSGEO4W_ROOT)\apps\Qt5\bin\moc.exe;%(FullPath) Moc%27ing %(Filename).h... .\GeneratedFiles\$(ConfigurationName)\moc_%(Filename).cpp "$(OSGEO4W_ROOT)\apps\Qt5\bin\moc.exe" "%(FullPath)" -o ".\GeneratedFiles\$(ConfigurationName)\moc_%(Filename).cpp" -DUNICODE -DWIN32 -DQT_LARGEFILE_SUPPORT -DQT_DLL -DQT_CORE_LIB -DQT_GUI_LIB "-I." "-I$(OSGEO4W_ROOT)\apps\Qt5\include" "-I$(OSGEO4W_ROOT)\apps\Qt5\include\QtCore" "-I$(OSGEO4W_ROOT)\apps\Qt5\include\QtGui" $(OSGEO4W_ROOT)\apps\Qt5\bin\moc.exe;%(FullPath) Moc%27ing %(Filename).h... .\GeneratedFiles\$(ConfigurationName)\moc_%(Filename).cpp "$(OSGEO4W_ROOT)\apps\Qt5\bin\moc.exe" "%(FullPath)" -o ".\GeneratedFiles\$(ConfigurationName)\moc_%(Filename).cpp" -DUNICODE -DWIN32 -DQT_LARGEFILE_SUPPORT -DQT_DLL -DQT_NO_DEBUG -DNDEBUG -DQT_CORE_LIB -DQT_GUI_LIB "-I." "-I$(OSGEO4W_ROOT)\apps\Qt5\include" "-I$(OSGEO4W_ROOT)\apps\Qt5\include\QtCore" "-I$(OSGEO4W_ROOT)\apps\Qt5\include\QtGui"testUi.cpp文件 moc_testUi.cpp文件 true修改完毕后保存工程文件,再次打开VS时会有如下提示: 3)修改testUi类 #ifndef TESTUI_H #define TESTUI_H #include "ui_testUi.h" //必须添加 "ui_类名.h" 头文件 class testUi:public QDialog,public Ui::Dialog { Q_OBJECT //添加 Q_OBJECT宏,为ui类提供信号槽机制 public: testUi() { setupUi(this); //ui类的构造函数中必须包含启动函数,可将代码与界面关联起来。 } ~testUi(){} }; #endif;testUi类修改完毕后再次编译,此时编译器会在moc_testUi.cpp中自动填充代码 4)连接信号槽 定义槽函数: void MainWindow::doActionTest() { testUi* p = new testUi(); p->show(); }connect函数连接信号槽 connect(mui->action_TestUi, SIGNAL(triggered()), this, SLOT(doActionTest()));最终实现主界面上点击一个按钮,弹出下列子窗体对话框。 |

 2)在上述工程文件中添加相应代码,并重新编译,即可生成对应的moc_testUi文件。 在项目中随机查找一个可以正常运行的ui类作为参照类,我找的是VsursPoleWidget类。工程文件中凡是出现VsursPoleWidget类的代码块都复制粘贴一份,然后把类名替换成你自己新建的子窗体类名testUi。 使用Notepad++的字符串查找功能在工程文件的4处地方发现了VsursPoleWidget类的代码块:
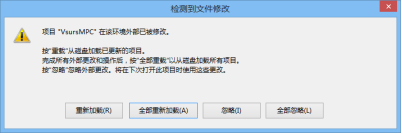 点击全部重新加载,再次编译,若重新生成过程发生错误,请回到项目文件夹下检查testUi.ui、testUi.h、testUi.cpp这三个文件的路径是否与VC++ Project工程文件下的路径一致。 重新生成后的testUi.ui、testUi.h、testUi.cpp文件在解决方案资源管理器中的位置会发生改变,不过问题不大,只要手动拖回原来的位置即可。 编译结束后会生成moc_testUi.cpp文件,但这还是个空文件,里面并没有代码。
【本文地址】
今日新闻 |
推荐新闻 |